Formula Controlled Graphics on Salesforce - Part II: Leveraging Parameters
As you can probably guess from the title, this follows on (belatedly) from my previous post, which was Part I: SVG and Visualforce. In that post I worked through the process of creating a Visualforce page that generated the XML Markup for an SVG image, using a standard controller to give us access to fields, so that the content could be generated based on a record specifed via the id URL parameter. The final version of the page code is below.
<apex:page standardController="Account" contentType="image/svg+xml; charset=UTF-8">
  <svg version="1.1" baseProfile="full" width="200" height="200" xmlns="http://www.w3.org/2000/svg">
    <style>
      .initials
      {
        font: 100px sans-serif;
        fill: white;
      }
    </style>
	<rect width="100%" height="100%" fill="{!CASE(Account.Rating, 'Hot', 'Red', 'Warm', 'Yellow', 'Cold', 'LightBlue', 'Grey')}"/>
    <text x="100" y="100" class="initials" dominant-baseline="central" text-anchor="middle">
      <apex:outputText value="{!LEFT(Account.FirstName, 1)}{!LEFT(Account.LastName, 1)}"/>
    </text>
  </svg>
</apex:page>
Let's Take a Step Back
So we have a page that generates a coloured square containing two initials, where the colour of the square is based on the rating of the specified account. That's great, the point of this two part series was to control the content using formulas. We've already seen how the id parameter is being used to specify a record, but if we wanted to generate an image for a different object, say an opportunity to indicate it's current stage, we'd have to create a whole new page so that it could use a different controller as it's the Account controller that's working out what the id means. Creating multiple pages for this is not ideal, so let's back-pedal a little and pull the controller out. We'll temporarily hardcode the text and colour:
<apex:page  contentType="image/svg+xml; charset=UTF-8">
  <svg version="1.1" baseProfile="full" width="200" height="200" xmlns="http://www.w3.org/2000/svg">
    <style>
      .initials
      {
        font: 100px sans-serif;
        fill: white;
      }
    </style>
	<rect width="100%" height="100%" fill="Orange"/>
    <text x="100" y="100" class="initials" dominant-baseline="central" text-anchor="middle">
        TODO
    </text>
  </svg>
</apex:page>
And Take a Step Forward With Parameters
If you don't know what URL parameters are, you'll soon realise that they're ubiquitous on the web: do a seach on Google, Twitter or DuckDuckGo (hint: use it) and you'll see they all add a parameter called q which contains the query you've made. In short, they're a way of passing extra information to a server that's processing a URL, and that includes the server rendering our Visualforce pages. Of course, we're creating the page so it's up to us to define what parameters we want to use; given what we've just stripped out of the page, you can probably guess that we'll use a parameter for the text to display and for the colour of the background.
Accessing page parameters in Visualforce is pretty simple, it just uses a global variable called $CurrentPage.Parameters, so if we want to access a parameter called text, we'd use this merge syntax: {!$CurrentPage.Parameters.text}. Let's add that to the page:
<text x="100" y="100" class="initials" dominant-baseline="central" text-anchor="middle">
    <apex:outputText value="{!$CurrentPage.Parameters.text}"/>
</text>
And now by specifying the text parameter in the URL, we get change the graphic displayed:
<<instance>>/apex/page/svg?text=hi
Adding a parameter for the colour is just as easy, we just put the merge syntax in the place for the fill attribute we've worked with before:
<rect width="100%" height="100%" fill="{!$CurrentPage.Parameters.col}"/>And use the same parameter name in the URL, using & to seperate parameters:
<<instance>>/apex/page/svg?text=hi&col=green
Note: If you want to use CSS hex codes for the colours, you'll need to replace the # with %23 in the URL. This is called URL encoding, and is a way to represent characters like #, ? (%3f) or space (%20) that have a special meaning in URLs themselves.
Something else that would make sense to parameterise would be the size of the image too, because it's unlikely that 200x200 pixels is always going to be a suitable size. Adding a couple of parameters for width and height (we'll call them w and h for brevity), is easy enough but there is something to be wary of if you use them in mathematical expressions, and that is types. Parameters are of a String type, so they work fine if you're not performing operations on them, for example, in defining the svg size:
<svg version="1.1" baseProfile="full" width="{!$CurrentPage.Parameters.w}" height="{!$CurrentPage.Parameters.h}" xmlns="http://www.w3.org/2000/svg">but if you need to treat them as numbers, and multiply or divide them such as to position the text in the middle of the image, or scale the font to be half the image height, you'll need to convert them to a number type using the VALUE() Visualforce function:
.initials
{
	font: {!VALUE($CurrentPage.Parameters.h) / 2}px sans-serif;
	fill: white;
}
<text x="{!VALUE($CurrentPage.Parameters.w) / 2}" y="{!VALUE($CurrentPage.Parameters.h) / 2}" class="initials" dominant-baseline="central" text-anchor="middle">
<apex:outputText value="{!$CurrentPage.Parameters.text}"/>
</text>Bring It All Together With a Formula
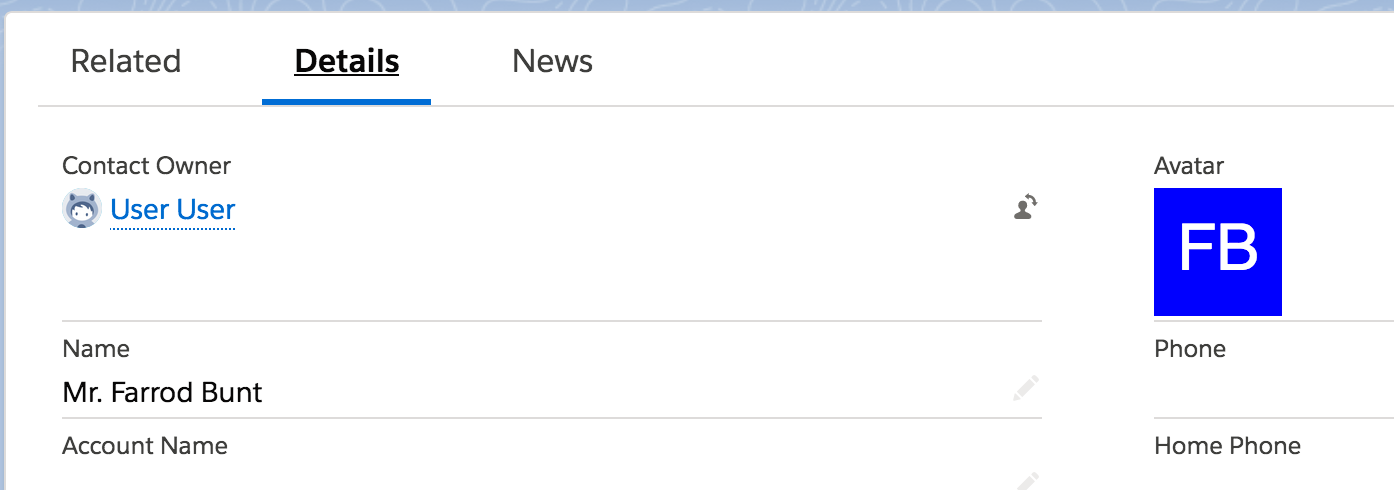
So last but not least: controlling it with a formula. Compared to everything else this is quite short and sweet. So for the object in question, add a formula field and choose Text for the type. The key to this the IMAGE function, the signature for which is: IMAGE(image_url, alternate_text [, height, width]). The square brackets indicate optional parameters, and if you've followed along then the dimensions can be ignored as we'll be providing them in the URL and specifying the size there.
As you've probably guessed, the image_url parameter is where our page comes into play alternate_text is what's placed in the page in scenarios where images aren't displayed, for instance due to a user's browser settings of if a user is using a screen reader. So the basic formula is this:
IMAGE('/apex/svg?w=64&h=64&text=hi&col=blue', 'hi')
Now all we need to do is manipulate the values for the parameters using regular formula functions. So to get the Contact's initials in this case, we can use LEFT() to grab just the first letter of the FirstName and LastName fields. Note that because the URL is a text string (it's between single quotes), if we wrote the functions within the quotes they wouldn't be interpreted by the platform, and the result would be the literal text "LEFT(FirstName, 1)" in the output image. So we need to split the string and join the parts: for this I recommend using + instead of & to avoid confusing between the ampersands that join the parts from being confused with those that join the parameters in the URL.
IMAGE('/apex/svg?w=64&h=64&text=' & LEFT(FirstName, 1) + LEFT(LastName, 1) + '&col=blue', 'hi')Note: In production the alternate_text parameter should have the same calculated value, I've left it as 'hi' here to allow us to focus on the URL.
Let Your Imagination Run Wild
Hopefully now you have the building blocks to create all kinds of formula-driven imagery, adding different elements to the SVG and different parameters that can then be controlled by the formula. A good starting point would be to take the above and make the col parameter be set according to some other field, for example a picklist that indicates a contact's loyalty status, or by combining TODAY() with the Birthdate field to change the graphic on the contact's birthday... just try and keep it tasteful!